
Yotta BC is a mining monitoring and management software designed by Goldshell development team. It can help users to manage Goldshell and other brand miners in an efficient way.
Introduction
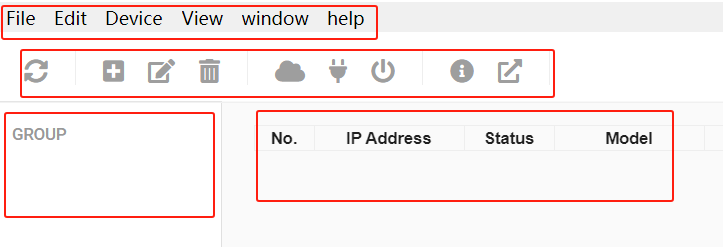
The software page is divided into four parts: menu, shortcuts, miner groups, and miner information.
Miner Groups
To enable efficient miner management, users can create miner groups based on IP ranges. Grouping miners helps streamline status monitoring and supports batch configuration.
There are three ways to create a miner group, allowing users to choose the method they prefer:
Click “File” and create a new group.
Click the “Create New Group” button in the shortcuts toolbar.
Use the shortcut Ctrl + N.
Note: In Yotta BC, many other functions can be performed in multiple ways, similar to the group creation process. To avoid redundancy, this user manual will describe only one method for each operation.
When creating a new group, four group modes are available for configuration.
Please note that when configuring groups or using other Yotta BC features, your computer and the target miners must be on the same local area network (LAN).
1. Empty Group: After setting the Group Name, click [Group Details] to create an empty group.
You can edit the group by right-clicking on it.
Tips: An empty group can be edited to become any of the other three groups.
2. IP Range Group: To create an IP Range Group, set the Group Name, Start IP, and Range (number of IP addresses), then click [Group Details].
If you need to add multiple IP ranges or delete existing ones, use the “-” or “+” buttons below the range field to manage the IP ranges.
Once an IP range group is created and devices are scanned, the Miner Information page will display all miners within the specified IP range.
Left-click a device number to select it; a green indicator will appear to show that the device is selected. Similar to Windows operations, you can:
Use Ctrl + left-click to select individual devices
Use Shift + left-click to select multiple devices
Use Ctrl + A to select all devices
After selecting multiple devices, you can perform batch operations, such as:
Pool configuration
IP settings
Power scheme adjustment (miner power mode)
Device reboot
For convenience, the Miner Information interface also provides options in the upper-right corner to hide invalid IPs and offline miners.
3. IP Collector Group: An IP Collector Group is used to automatically collect miners with unknown IP addresses. After this group is created, press the IP button on a miner manually, and the miner will be automatically added to this group, along with its network information.
Tips: If miners need to be assigned fixed IP addresses based on their shelf positions, this group supports batch IP configuration. For example, you can press the IP button on each miner in sequence, then select all the collected devices and perform batch IP settings. Please make sure that the physical order of the miners matches the intended IP assignment. If a miner’s IP is not collected during the IP button pressing process due to network or device issues, performing batch IP assignment may result in IP-to-miner mismatches.
If network or equipment issues occur after IP collection, only the affected miners will fail to receive IP assignments. In such cases, Yotta BC will provide alerts for miners with abnormal IP settings.
4. IP Setting Group: IP Setting provides an alternative method for batch IP assignment within a group, which is different from the IP Collector method.
First, configure the target network information, including gateway, netmask, DNS, IP range, and quantity.
Within the IP range, specify the starting IP address, and set the quantity to indicate how many IP addresses will be assigned in this batch.
After completing the configuration, click “Add”. The configured target IP range will then be displayed on the page, and all IP addresses in the list will initially be marked as “Unused.”
Next, press the IP button on each miner that needs to be configured. The system will assign IP addresses sequentially from top to bottom in the list to the corresponding miners.
Once an IP address is successfully assigned, its status will change from “Unused” to “Used,” and the miner’s original IP information will also be displayed on this interface.
Note:
After using the IP Setting function, please promptly close Yotta BC or switch to another group interface. Otherwise, pressing the miner’s IP button will continue to affect the miner’s IP configuration and may result in unintended IP changes.
Tips: During the IP setting process, if any anomalies or special requirements occur, you can use the right-click menu to modify the status of target IPs.
If you accidentally press a miner’s IP button twice, resulting in two IPs being assigned, you can select the already used IPs, right-click, and set them back to Unused. After resetting, you can press the miner’s IP button again to reassign the correct IP.
If a miner does not require further IP assignment, or if a specific IP needs to be skipped or removed due to hardware or network issues, you can use the Delete or Set to Skip options.
If the IP you want to assign is not the currently active IP in the table, you can right-click and set a specific IP as the initial valid IP, then continue the IP assignment process.
Functions
1. Setting IP: Select one or more devices, click “Device” in the menu bar, choose “IP Management”, uncheck DHCP, and then configure the network settings.
Tips: When assigning IP addresses to multiple miners, after defining the starting IP, the system will configure the selected miners in sequence from top to bottom. The last digit of the IP address will automatically increase by 1 for each subsequent miner.
If multiple miners are selected non-consecutively in the interface (using Ctrl + left-click), the IP addresses assigned to those selected miners will still increment by 1 in the order displayed.
Note:
For miners that already have a static IP assigned and need to be taken offline or relocated, you must switch the IP configuration back to DHCP while the network connection is still available. This should be done before powering off or moving the miners.
Failing to revert to DHCP may prevent the miners from obtaining an IP address or reconnecting to the network after being powered on again or relocated.
If this occurs, DHCP can only be restored by long-pressing the miner’s physical reset button.
2. Group Settings Archive and Retrieval:
After completing the configuration of mining field group settings, you can save the group settings file based on your needs. Click “File” → “Save As”, enter a file name, and save it to the desired location.
To retrieve previously saved group settings, click “File” → “Open”, then select and open the corresponding group settings file.
3. Set Pools: Select one or more devices, click “Device” in the menu bar, choose “Set pools”. All miners can be set up with 3 mining pools, with priority decreasing from the top pool to the bottom pool. The pools with lower priority will only be used if all higher priority pools are offline.
Tips: When the IP suffix feature is enabled, miner names will be automatically generated based on the miner’s IP address.
For example, if the pool worker name is set to “shminer” and the miner’s IP address is 192.168.1.1, the miner name will automatically become:
shminer.192_168_1_1
If additional identifiers are required (for example, when the same IP range exists across different LANs), you may add an extra suffix to the miner name.
For instance, if the pool worker name is configured as “shminer.a1”, the miner name for IP 192.168.1.1 will be:
shminer.a1_192_168_1_1
⚠️ Important: The miner name can contain only one dot (.).
If more than one dot is used, the mining pool may fail to recognize the miner name correctly.
4. Set Led Status: Select one or more devices, click “Device” in the menu bar, choose “Set Led Status”.
5. Reboot Devices: Select one or more devices, click “Device” in the menu bar, choose “Reboot".
6. Factory Reset: Select one or more devices, click “Device” in the menu bar, choose “Factory Reset". Once set, the miner's IP will change to DHCP mode, and all mining pool information will be cleared.
7. Update Firmware: Select one or more devices of the same model, click “Device” in the menu bar, choose “Update Firmware".
8. Open admin page:
Right-click on a miner, and within the right-click menu, you can access the miner dashboard. When selecting multiple devices, you can open multiple back-end webpages simultaneously.
Others
Other settings: Click "Edit" in the menu bar, then select "Preference".
Here, you can set the miner dashboard unlock password, configure the conditions for highlighting specific devices, set the system language, and more.
Comments
0 comments
Article is closed for comments.